Tutorial Directions:
Step 1 - Creating the Base:
To begin creating this look, you should put down an eyeshadow primer to keep your eyeshadow lasting all day (or in this case night). I chose to use Elf's Eyelid primer that is only $1 at Target. I've found that it works great. After you have your eyelid primer down, put a white base down to make the pastel green show up brighter and more vibrant. I chose to use NYX jumbo eye pencil in Milk. Using your finger, spread it all over the eye until it is mostly blended out.
Step 2 - Creating the Shape:
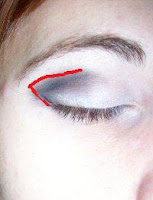
 This step is the most time consuming (at least for me!). To begin creating your shape, use an eyeliner pencil and draw a line from the lash line up and around to your crease area. I have created a red line to show you how to do this.
Once you have created this line with the eyeliner pencil, take a smudge brush and begin to smudge the liner across the shape you have created. You want to get rid of the harsh line from the eyeliner WITHOUT losing the shape. You should also take the smudge brush and pull the eyeshadow down onto the lid from the line. Keep doing this until it looks exactly like you want it to look.
Step 3 - Filling in the Color
 After the shape is how you want, it is time to get the color filled in. It is best to fill in the black in the outer-V shape that you created. Put just a little bit of black shadow (I used a matte black from BH Cosmetics.) Use a blending brush and blend it in a circular motion to keep the shadow concentrated in that area. Taking the green pastel color, work from the outer-V to the corner of your eye by patting the shadow onto the lid. Blend the color into the black to create the gradient effect. If you lose too much of the black, make sure to fill it back in to keep the corners darker. Taking a light highlighter color, use your fingers (or a brush) to apply the color to your brow bone to make your eyes pop. Your makeup should be looking like something similar to this picture to the right. Remember to BLEND BLEND BLEND.
Step 4 - Eyeliner and Mascara
The 4th step would be to line your upper lash line with a liquid or cream eyeliner. This will pull the smokey look together. I also smudged black shadow under neath my lower lash line to smoke out the eye even more. Use a eyelash curler to curl your lashes and then apply your favorite mascara. Make sure to apply mascara to your lower lashes, too! (If you prefer fake lashes, this would be the time to apply them). Line your lower waterline with black mascara and smudge it using the smudge brush.
Step 5 - Finishing the Face
After that is done, you should apply your foundation. I used a foundation brush and carefully colored the area around my eye makeup with the foundation. Apply your blush to your cheek bones by making a fishy face. I used ELF Fushia Fusion blush (which I love!) I applied a lipstick by NYX called "Margarita" to finish off the look.
 The final look is here to the left! I think this look is very pretty and nice to wear out. It is a little more subtle if you are not so comfortable wearing DARK DARK eyeshadows. I hope you all enjoyed my first tutorial. :)
Here are the colors that I used.
Products used are featured here in this photo. I did forget to picture the NYX jumbo eye pencil in Milk and the ELF eyelid primer!


Great tutorial! I absolutely love how you do your eye makeup, so it's great that I now have a step-by-step so I can try and recreate it on my own face! :-P Very cute new layout, by the way!
ReplyDelete-Anna
prettymuchreviews.blogspot.com